ベーシック アドベントカレンダー 5日目です。
Web Components でフォーム周りのカスタムパーツの作り方の解説をします。フォームのカスタムパーツは、プロジェクト内だけでなく汎用的なコンポーネントを自作して外部に配布する王道なコンポーネントな気がします。しかし、普通のコンポーネントと同じようなノリで作っているとハマってしまったところがいくつかあったので、それらを紹介します。
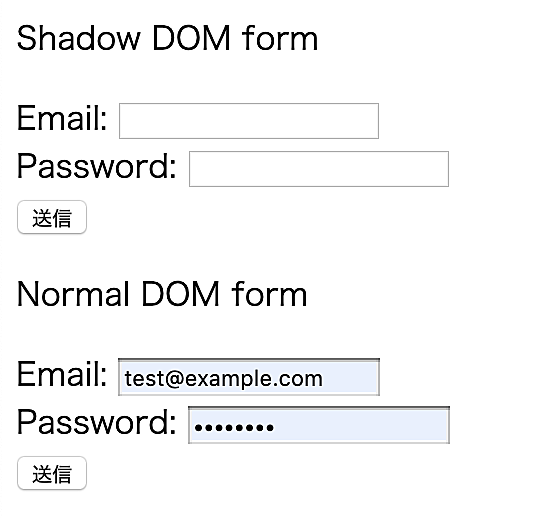
Shadow DOM 内部の入力フォームは autocomplete が効かない
<my-login-form></my-login-form>
<p>Normal DOM form</p>
<form method="post" action="./">
  Email: <input type="text" name="id" value=""><br>
  Password: <input type="password" name="password" value=""><br>
  <input type="submit">
</form>

<script>
class MyLoginForm extends HTMLElement {
  constructor() {
    super()
    this.attachShadow({mode: 'open'})
  }

  connectedCallback() {
    this.render()
  }

  render() {
    this.shadowRoot.innerHTML = `
<p>Shadow DOM form</p>
<form method="post" action="./">
  Email: <input type="text" name="id" value=""><br>
  Password: <input type="password" name="password" value=""><br>
  <input type="submit">
</form>
`
  }
}

customElements.define('my-login-form', MyLoginForm)
</script>
例えば、ログインフォームをコンポーネントとして作ったとします。一般的に期待されるのは一度入力した ID / Password はブラウザが記憶し、次回からは自動で入力されている挙動です。しかし現時点では Shadow DOM 内部の入力フォームに対して autocomplete は効きません。

これについては議論されていたり issue が立っていたりするので、おそらく時間の問題で解決されると思います。ただ、修正されるまでのスマートな回避方法は僕が考えた限りではなさそうです。
Shadow DOM を通常の form に入れても作用しない
ちょっと分かりにくい書き方ですが、要は Shadow DOM 境界外の <form> の中に、カスタマイズした入力フォームパーツを配置しても、入力した内容は submit されないということです。
<form method="post" action="./">
	<my-input-text></my-input-text>
  <input type="submit">
</form>

<script>
class MyInputText extends HTMLElement {
  constructor() {
    super()
    this.attachShadow({mode: 'open'})
    this.render()
  }
  render() {
    this.shadowRoot.innerHTML = `<input type="text" name="my-input-text">`
  }
}
</script>
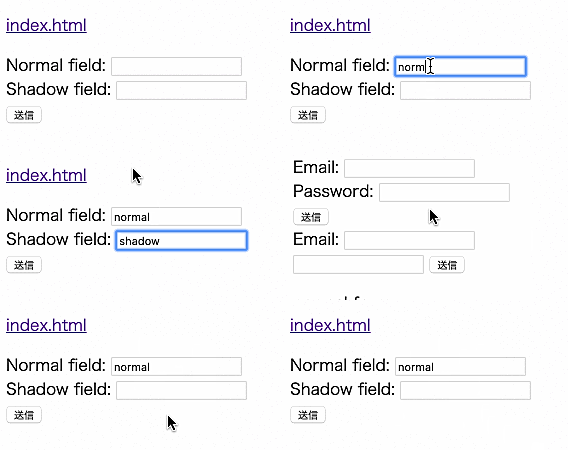
この <my-input-text> に入力したものは無情にもどこにも POST されません。これは <form> と <input> の所属する Node Tree が違うから起こる現象です。これを解決する方法は主に2つあります。
formdata イベントを利用してフォームデータを操作する
<form method="post" action="./formdata-event.html">
  <input type="text" name="normal-field">
  <formdata-input name="shadow-field"></formdata-input>
  <input type="submit">
</form>

<script>
class FormdataInput extends HTMLElement {
  constructor() {
    super()
    this.attachShadow({mode: 'open'})
  }

  connectedCallback() {
    this.render()
    this._form = this.findContainingForm()
    this._form.addEventListener('formdata', event => {
      event.formData.append(this._input.name, this._input.value)
      console.log(Array.from(event.formData.entries()))
    })
  }

  render() {
    this._input = document.createElement('input')
    this._input.name = this.inputName
    this.shadowRoot.appendChild(this._input)
  }

  get inputName() {
    return this.getAttribute('name')
  }

  findContainingForm() {
    // ref https://web.dev/more-capable-form-controls/
    const root = this.getRootNode()
    const forms = Array.from(root.querySelectorAll('form'))
    return forms.find((form) => form.contains(this)) || null
  }
}

customElements.define('formdata-input', FormdataInput)
</script>
Chrome 77 から formdata というイベントが利用できるようになりました。これはフォームを送信する直前に発火するイベントです。submit イベントの後に発火し FormData オブジェクトを提供してくれます。つまり送信するフォームの内容を自由にここで操作が可能です。
ここでは formdata イベント内で、Shadow DOM で生成した <input> タグのデータを append することで送信しています。
formAssociated を使う
もう一つの方法は formAssociated を使って通常のフォームパーツと同じように扱うようにするやり方です。こちらのほうが、汎用性は高いです。ただ、実装しなければならない量は増えます。
<form method="post" action="./form-associated.html">
  <input type="text" name="normal-field">
  <form-associated-input name="shadow-field"></form-associated-input>
  <input type="submit">
</form>

<script>
class FormAssociatedInput extends HTMLElement {
  static formAssociated = true

  constructor() {
    super()
    this._internals = this.attachInternals()
    this.attachShadow({mode: 'open'})
  }

  connectedCallback() {
    this.render()
  }

  render() {
    this._input = document.createElement('input')
    this._input.name = this.inputName
    this._input.addEventListener('change', () => { this.setFormValue() })
    this.shadowRoot.appendChild(this._input)
  }

  get value() { return this._input.value }
  set value(v) { this._input.value = v }

  get inputName() {
    return this.getAttribute('name')
  }

  setFormValue() {
    this._internals.setFormValue(this.value)
  }
}

customElements.define('form-associated-input', FormAssociatedInput)
</script>
まず formAssociated で true を返すことで、コンポーネントを通常のフォームパーツと同じように UA が扱ってくれるようになります。次に attachInternals() で setFormValue() を使えるようにします。この ``setFormValue()` でフォームに値をセットすることができます。
必要最低限の構成で言えば、この formAssociated と setFormValue() だけで入力パーツとして動きます。入力値は <input> の変更イベント(keyup など)を使ってセットしてあげれば良いです。ただし、通常のフォームパーツと同じにするという意味では以下のように構成を作ってあげたほうが良いです。
// これがないと document.querySelector('form-associated-input').value や value = '' が使えない
get value() { return this._input.value }
set value(v) { this._input.value = v }
他の要素については HTMLInputElement のインターフェイスを見てみてください。これらは必要であれば自前で実装をする必要があります(もしくは継承をする)。
入力内容をリストアする

通常の入力フォームはおそらく他のページへ遷移などをして戻ってきても、入力した内容が残った状態になっているかと思います。しかし上記のような Web Compoentns で作成したパーツは勝手にリストアをしてくれません。なので自前でリストアをする必要があります。
class FormAssociatedInput extends HTMLElement {
  static formAssociated = true

	// ... snip ...

  setFormValue() {
    this._internals.setFormValue(this.value)
  }

  formStateRestoreCallback(state, mode) {
    if (mode === 'restore') {
      this.value = state
    }
  }
}

customElements.define('form-associated-input', FormAssociatedInput)
自前といっても実装は簡単です。formStateRestoreCallback というイベントが用意されているので実装して値をセットするだけです。
また setFormValue には第2引数に state オプションがあり、リストアする際により詳細なデータを元に処理が可能な仕様になっているのですが Chrome 78 で試してみたところ値を取得することができませんでした…。やり方が悪いのかもしれません。
this._internals.setFormValue(this.value, `categoryA/${this.value}`)
なお formStateRestoreCallback のようなフォームライフサイクルは以下の4つがあります。
- formAssociatedCallback
- formDisabledCallback
- formResetCallback
- formStateRestoreCallback
入力内容をバリデーションする
バリデーションのロジック自体は自前で実装するのですが、バリデーションのメッセージを表示できるようになるようです。Chrome 78 の時点ではまだ実装はされていなそうです。
<card-input required>
  #shadow-root
    <input id=cardno pattern="[0-9]{15,16}" required>
    <input id=expiration type=month required>
    <input id=cvc pattern="[0-9]+" required>
</card-input>

<script>
this._internals.setValidity(
	{valueMissing: true},
	'Please fill out this field with the expiration month of the card',
	this.#expiration
);
</scipt>
参考: https://github.com/w3c/webcomponents/issues/187#issuecomment-486890626
というわけで、Web Components でフォームパーツを作っていく際にハマりそうなポイントを解説しました。
